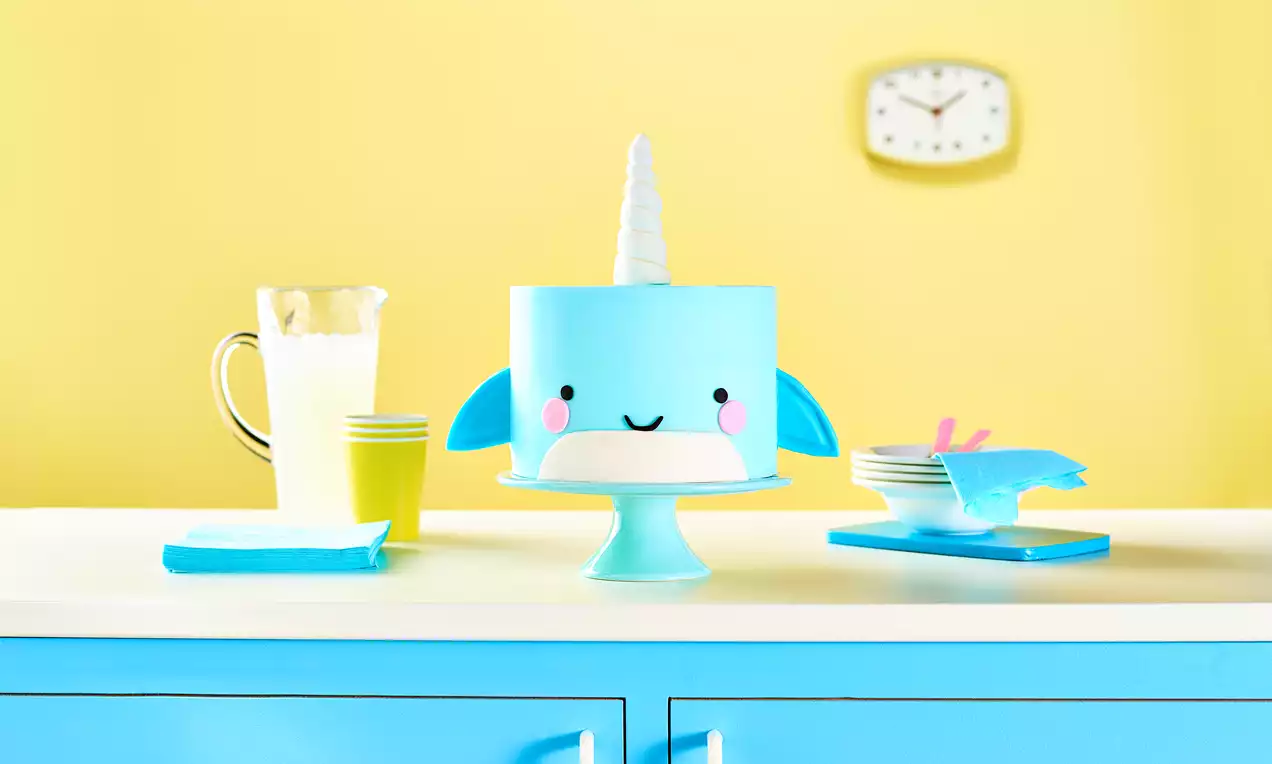
Narwhal Cake
Recipe Ingredients
How to Prepare:
Preheat your oven to 180⁰C/160⁰C fan oven/gas mark 4. Grease and line 3x 8inch baking tins.
Put your softened butter and sugar into a bowl and beat with an electric mixer until pale in colour and fluffy in texture.
In a jug, beat together your eggs, Vanilla Extract and milk. Add to your creamed butter and sugar along with the flour and ground almonds.
Mix until well combined.
Divide your cake batter equally between the 3 tins and bake in your preheated oven for 35-40 minutes. To test if the cake is ready insert a skewer into the cake and if it comes out clean then it is ready.
Cool the cakes in the tins on a wire rack for 15 minutes then turn out and cool completely.
When the cakes are cooled place one on a 10 inch cake board or cake plate securing it with a little bit of buttercream to stop the cake sliding around. Pipe or spoon a 1cm thick ring of Vanilla Buttercream Style Icing around the outside edge of the cake. Then within the ring of Buttercream spread a thin layer of jam.
Place the second cake on top and repeat the Vanilla Buttercream ring and jam layer.
Add your third layer of cake and then crumb coat the whole cake with the remaining Buttercream. Start by spreading Buttercream first on the top of the cake and then work your way down the sides until the whole cake is covered in a thin layer of Buttercream.
Put in the fridge to chill and set for 1 hour.
Whilst your cake is chilling make your horn and flippers.
For the horn take a wooden or bamboo skewer and shorten it to about 17cm.
Take 200g of the White Fondant. Dust your work surface with a little icing sugar. Lightly knead the fondant until it becomes pliable. Then roll into a thick sausage that is about 30cm long and gradually gets thinner at one end. The thick end should be about 2cm wide and the thin end about 0.5cm wide.
Coat the top 10-12cm of your skewer with water to help glue the Fondant to the stick. Start rolling the thin end of the Fondant sausage around the skewer, gently squeezing the layers together as you go. As you roll the Fondant around the skewer it should be tapered at the top and get wider as you get to the bottom. Leave about 5cm of skewer uncovered so you can attach the horn to the cake. Once you reach the end of the fondant, cut the base of the fondant horn in a straight line so that it has a flat bottom, then take a thin paintbrush and paint a little water between the rings of the horn to glue them together.
Place the horn on a piece of non-stick greaseproof paper and allow to air dry uncovered overnight to harden.
To make your flippers, first make a template using a bit of card and draw and cut out a leaf shape so that one end is tapered and the other end flat so it is about 5cm wide at the flat end and about 7cm in length. Take about 100g of your White Fondant Icing and colour it with a few drops of the Extra Strong Blue Colour Gel to get a nice bright blue colour. Knead the Fondant to mix in the colour evenly.
Dust your surface with a little icing sugar and divide the blue fondant into two. Using a rolling pin, roll out one piece of the blue fondant so that it is about 1cm thick. Take your flipper template, place on top of the fondant and cut around it to make the flipper. Repeat with the other piece of the fondant, but make sure you flip over your template so that you have a right hand side flipper and a left flipper. Take a cocktail stick, dip it in a little water and gently insert it halfway into a flipper. Repeat with the other flipper. Lay the flippers onto a flat surface lined with non stick greaseproof paper. Leave to air dry uncovered overnight.
Now prepare the Fondant to cover your cake. Take 1kg of White Fondant Icing, knead lightly then add about 2 drops of Extra Strong Blue Food Colour Gel to get a pale blue colour. Dust your surface with icing sugar then knead the Fondant Icing to mix in the colour until it is evenly distributed. Be careful not to over work your Fondant Icing otherwise it will get too soft. Roll the Fondant into a ball and flatten into a circle.
Roll out the blue Fondant Icing into an even circle about 0.5cm thick and about 20-21 inches in diameter so that it is wide enough to cover the cake.
Lift the fondant icing using your rolling pin and drape over the top of the cake. Quickly smooth the top and sides of the cake using the palms of your hands, smoothing the sides in a upwards motion to prevent tearing. Trim the excess Fondant Icing around the base of the cake with a sharp knife.
Now make the belly and face. Take the remaining White Fondant (about 100g) and divide into two.
Lightly dust your surface with icing sugar, take one piece of Fondant and roll out to about 0.5cm thick. Cut a thin rectangle about 15cm long and 5cm wide to make the Narwhal’s belly. With a sharp knife create curved ends so that the top of the belly is about 2cm shorter on each end than the bottom. Glue the belly to your cake with a little water ensuring the belly is central.
To make the cheeks, take your remaining White Fondant and cut in half. Put half to one side then with the other half colour with about 1 drop of Extra Strong Pink Food Colouring Gel and knead into the Fondant to make a pale pink colour. Once the colour is evenly distributed, roll out the pink fondant to about 0.5cm thick. Cut two circles about 2cm in diameter. I used the wide end of a piping nozzle to cut out the circles or you could use a small bottle lid. Glue the cheeks to your cake placing them just above the top corners of the belly.
Take the remaining White Fondant and colour with a couple of drops of the Extra Strong Black Food Colour Gel to get a dark black colour. Knead until evenly distributed then roll into a thin sausage about 0.5cm thick. Cut off two small pieces to make the eyes. Roll each eye into a ball then flatten gently with your finger tip. Glue each eye to the cake with a little water and place just above the inner side of each cheek.
To make the mouth – take another small piece of the black fondant and roll into a thin sausage about 3cm long. Using a paintbrush, paint a little water onto your cake where you want to place the mouth in the centre of the cake above the belly. Gently glue the mouth to the cake in an upward curve so that it looks like a smile.
To finish the cake, take your dried out flippers and insert into each side of the cake at the same height. Then take your horn and insert in the centre of the top of the cake.
RELATED RECIPES
More delicious ideas for you

Tiered Mirror Glaze Cake
Naked Vanilla Cake
Pink Lemonade Drip Cake
Rainbow Carnival Cake
Meringue Kiss Cake with marbled buttercream
Rainbow Sprinkle Pinata Cake
Siobhan Unicorn Cake