
How to Measure Baking Ingredients Correctly
You’ve bought all your ingredients, you’ve got your recipe and it’s time to bake. Yes you might love dolloping on icing or sprinkling hundreds and thousands on your bakes when they’re done, but you need to get with the baking first.
And when it comes to baking it’s super important to get your measurements spot on. Whether it’s dry ingredients like flour, wet ingredients like milk or semi-liquid ingredients like honey you need accurate measurements. Trust us, you’ll be able to taste it in your final bake! Here’s what you need to know to measure baking ingredients correctly. We’ll cover:
• Your essential measuring tools
• How to measure dry ingredients
• How to measure liquid and semi-liquid ingredients
• Cups to grams converter
Make sure you’ve got the following measuring tools to hand:
• Dry measuring cups: These are made from either plastic or metal and don’t have a spout to pour. They enable you to level off your ingredients.
• Liquid measuring cups / jugs: These have a lip for pouring and are made out of glass or clear plastic.
• Measuring spoons: Metal or plastic spoons that enable you to measure small quantities of dry or liquid ingredients.
How you measure your dry ingredients will depend on what you’re working with. Some dry ingredients such as flour, oats, and Fine Dark Cocoa Powder call for the ‘spoon and level’ method. For other ingredients like sugar, it’s all about the ‘scoop’ method.
We’ll explain in a little more detail below:
So many people get it wrong when it comes to measuring flour, but it’s so important you get it right. It can be make or break for your bake! So, how to measure flour without scales?
To measure flour, you should use the spoon and level method. To do this, use a spoon to scoop the flour into your measuring cup. Once you’ve spooned your flour in, use the back of a knife to level off the top of the measuring cup. Don’t pack the flour down or tap the measuring cup, as you don’t want your flour to settle in the cup.
Your recipe might also ask you to sieve your flour. A great way to do this is to sieve it onto a sheet of greaseproof paper so it’s easy to pour it into your mix. It also reduces the washing up as you don’t need to use an extra bowl.
When it comes to sieving flour, remember:
• 1 cup of flour, sieved – means measure the flour first, then sieve
• 1 cup of sieved flour – means sieve the flour first then measure it
The spoon and level method again is the best way to measure oats. With oats, look out for the difference between oat flakes and finely chopped oats.
Oat flakes are ideal for granola, overnight oats or porridge. If your recipe calls for finely chopped oats, rather than getting out your knife you can just use your blender.
The method you use to measure sugar depends on the type of sugar you’re dealing with.
White granulated sugar: scoop the spoon or measuring cup directly into the bag until it is overflowing then level off with a knife. This is the scoop method. Measure the ingredients exactly as the recipe states as sugar crystals play an important role in breaking down other ingredients.
Brown sugar: Use the scoop method as you would for white sugar, and make sure it is packed down into the measuring cup or spoon. Also ensure you use light brown sugar unless your recipe specifically states dark brown.
Icing sugar: Opt for the scoop and level method as you would use for flour.
A lot of recipes require liquids like milk and semi-liquids like honey or peanut butter. But how do you measure them? For liquids you’ll need a liquid measuring cup or jug, but for non-liquids make sure you use your dry measuring cup.
We’ve explained how to measure them below:
Liquids are super simple to measure, you just need a good eye! All you need to do is pour your chosen liquid, whether milk, non-dairy milk, water, oil etc, into a liquid measuring jug or cup.
Then you need to make sure the liquid is at exactly the right level on the measuring jug, by bending down (keep the jug flat on your work surface) and checking it at your eye level.
The likes of gooey peanut butter, tangy apple sauce, runny honey or creamy yoghurt will need to be measured in your dry measuring cup not your liquid measuring cup. To measure, simply scoop into the cup using a spoon then level just like you would do with flour or oats.
A lot of recipes have measurements in cups, but sometimes you need a little more accuracy. This is where kitchen scales come in. If your recipe asks for exact weights and measures, you’ll get much better results if you take the kitchen scales out of the cupboard.
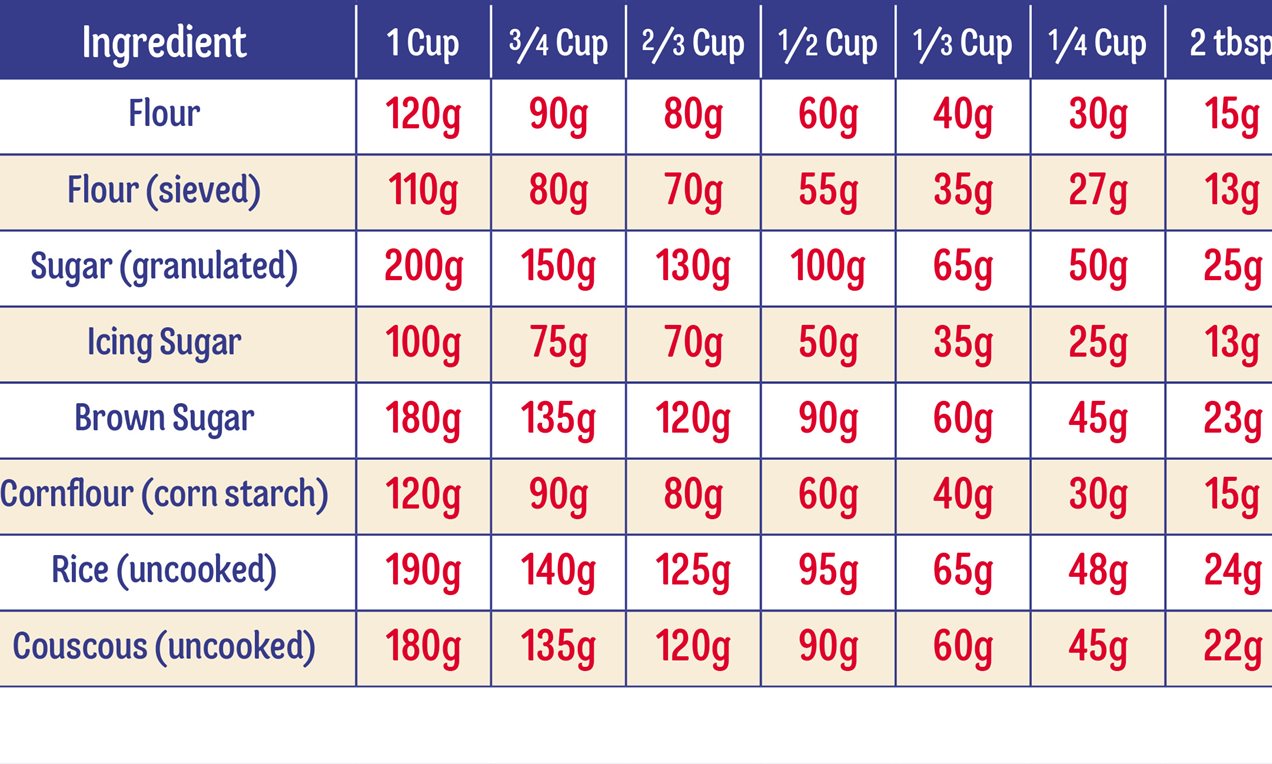
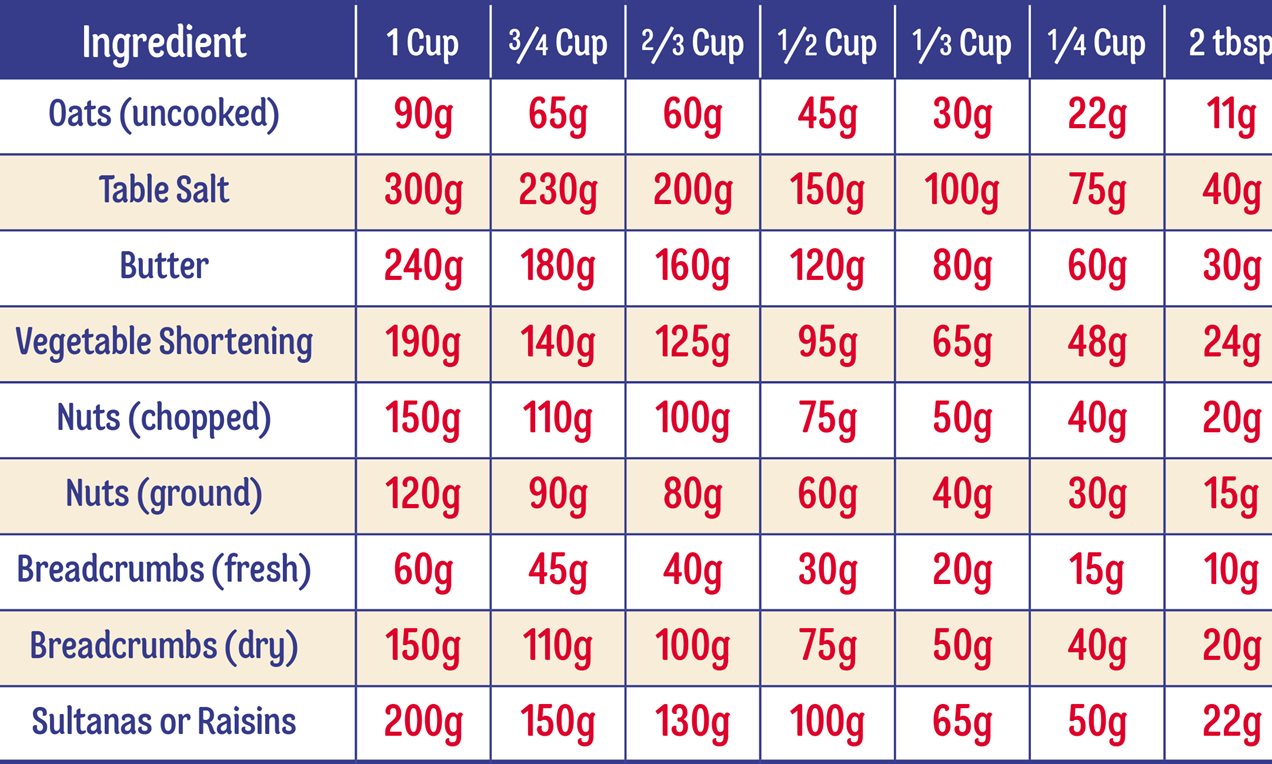
If you need to convert cups to grams, just use our helpful baking conversion chart:
The proof really is in the pudding!
Measuring your ingredients is super important when it comes to baking. If you get the correct measurements, your bakes will look and taste great. But if you don’t, all your efforts may go to waste. To get it spot on, you’ll need the right equipment using the right technique, and if you need to be precise don’t forget those all-important kitchen scales.
Why is accurate measuring so important in baking?
Baking is like science. Even small differences in ingredients can affect different aspects of the bake:
-Texture of the baked product will be affected.
-The bake may not rise and be fluffy.
-And it is also good for Flavour balance, making sure the flavour is correct in the bake.
What’s the most accurate way to measure ingredients?
We would recommend always using a kitchen scale, as they are the most accurate and they are also:
-Measures in grams, ounces, ml and fluid ounces.
-Eliminates guesswork
-Especially important for flour and delicate recipes
How do I measure sticky ingredients like honey or syrup?
There are a few tips that would hep measure out sticky ingredients:
-Lightly grease the measuring cup or spoon first
-Or use warm water to rinse after
-Warm the ingredients slightly to make it runnier.
-Measure straight into the mix on a kitchen scale.
What does “heaping” vs “level” mean?
Level means flat across the top, this is standard in most recipes unless started otherwise.
Heaping: Slight piled up above the spoon or cup
For more tips and tricks, check out our other guides such as How to Make a Perfect Cheesecake Base, How to Temper Chocolate andHow to Line and Grease a Cake Tin.
RELATED RECIPES
More delicious ideas for you

Spiced Vanilla Cookie Wreath
Ghost Wands