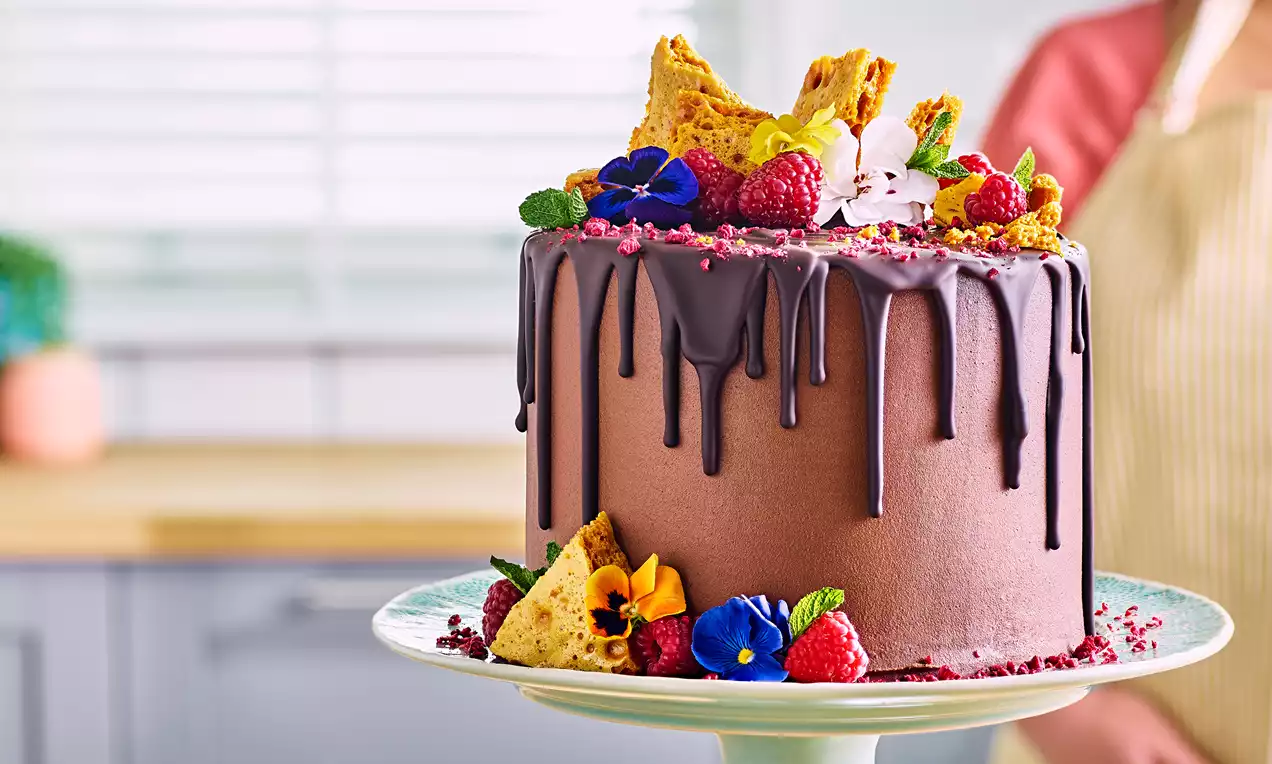
Chocolate, Raspberry and Honeycomb Cake
Recipe Ingredients
Buy the Products
How to Prepare:
First things first, preheat your oven to 180 degrees celcius and grease and line 4x 7 inch cake tins
Now we’re ready to dive in, so in a large bowl whisk together the melted butter and oil until blended. Add in the water then whisk again until everything is well blended.
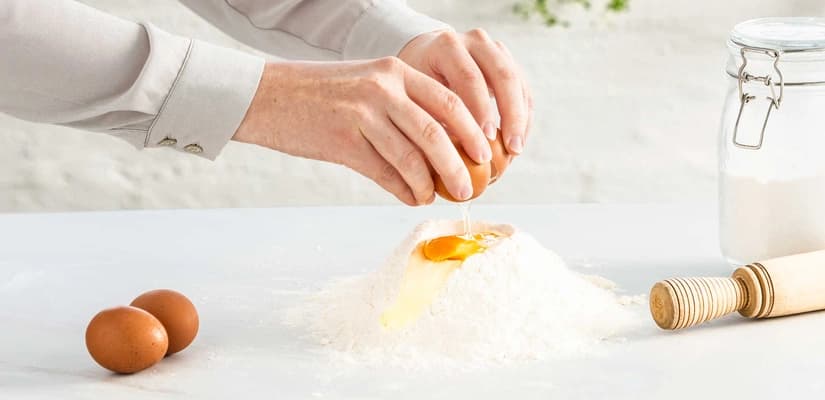
Grab yourself a jug and beat together the eggs, vanilla and soured cream, then add to the large bowl with your butter mix and whisk again. Then in a separate bowl mix together the flour, cocoa powder, caster sugar, light brown sugar and the bicarbonate of soda and baking powder and add to the wet ingredients and whisk until well mixed.
Divide the cake batter between the cake tins you lined and greased earlier and bake in the oven for 25-30 minutes until cooked. You’ll know they’re ready when you pop a skewer into the centre of the cake and it comes out clean.
Once the cakes are out of the oven, leave them to cool in their tins for 30 minutes then remove from the tins and cool completely.
While the cakes are cooling, it’s time to crack on with the honeycomb! Grab yourself a flat baking tray and line with a piece of greaseproof non stick paper.
Grab a deep, heavy based pan, pop in the caster sugar and golden syrup and put on a high heat. Heat until the sugar is melted, swirling the pan occasionally to mix the sugars as they melt.
Top tip: make sure not to mix with a spoon as this can cause the mixture to crystalise and you’ll end up with the wrong texture for your honeycomb (crazy, we know!). Boil the mixture until it turns a rich amber colour – just like the colour of maple syrup. Make sure to keep a close eye on your pan because if the honeycomb burns it will taste bitter!
Okay this next bit requires a little bit of speed, so get ready! Quickly add the bicarbonate of soda and whisk in, then speedily pour the frothing honeycomb onto the baking tray you lined earlier to cool and harden. If you want to break up the bake, your honeycomb can be made the day before and kept in an airtight container or wrapped well in non stick baking paper and cling film.
To make the white chocolate and raspberry buttercream filling, melt the white chocolate in a glass bowl in the microwave in 20 second bursts, stirring in between until melted. This mixture is very hot! So leave to cool for 10-15 minutes until it’s room temperature but still runny.
Pop the butter into a large bowl and beat with an electric whisk or freestanding mixer until light and fluffy. Then sift in the icing sugar then add the vanilla extract and beat again until everything is all mixed together.
Pour in the melted white chocolate and beat together for a few of minutes until light and fluffy in texture. Then mix in the raspberries until they’re all broken up and ta-da, you’ve got yourself a pretty pink buttercream!
Next up is the dark chocolate buttercream coating. Now you’ve whipped up the white chocolate and raspberry buttercream you know the drill! Melt the dark chocolate in a glass bowl in the microwave, heating in 20 second bursts, stirring in between until melted and leave to cool for 10-15 minutes until it’s room temperature but still runny.
Pop the butter into a large bowl and beat with an electric whisk or freestanding mixer until light and fluffy. Then sift in the icing sugar then add the vanilla extract and beat again until everything is all mixed together. Add the melted chocolate and beat together for a few minutes until light and fluffy in texture. Buttercream number two is ready to go!
Ready for the best bit?! It’s time to assemble your cake! To fill the cakes – level each cake with a bread knife. Pop your first layer on a cake board slightly wider than your cake then spread on a layer of white chocolate and raspberry buttercream. Make sure to save plenty of buttercream to cover all the layers of your cake in a minute!
Now pop the second layer of cake top and repeat the buttercream filling process. Add the third layer of cake then spread the last of your white chocolate and raspberry buttercream all over the cake, then pop in the fridge to chill and set for 30 minutes.
Remove the cake from the fridge and cover with a very thin layer of the dark chocolate buttercream as a crumb coat. Applying a crumb coat seals in any pesky stray crumbs before you come to do the final layer of buttercream, so it looks lovely and smooth. Pop the cake back in the fridge for another 30 minutes to set.
Once the crumb coat has set cover the cake in a final coating of the dark chocolate buttercream, smoothing with a palette knife or cake smoother. You guessed it, back into the fridge for a final 30 minutes to set before adding the final decorations.
Okay, you can take the cake out of the fridge for the last time, because we’re ready for the final decorations! Break up the 100g dark chocolate into a glass bowl and melt in the microwave in 30 second bursts, stirring in between until the chocolate has melted then leave to cool slightly. Using a spoon, drip the melted chocolate over the top of the cake all the way to the edges, so it runs down the side of the cake forming a glossy drip effect all the way round.
Now it’s time to get creative! Break up the honeycomb into whatever size chunks you fancy and pop on top of the cake. Show off your creative flare with the finishing touches. We’ve gone for a few sprigs of mint, a sprinkling of fresh raspberries and edible flowers, with one last scattering of freeze dried raspberries pieces for good measure.
Et Voila! You’ve got yourself a jaw-dropping showstopper, worthy of a Hollywood Handshake.
RELATED RECIPES
More delicious ideas for you
Whole Cake Recipes
Chocolate, Caramel and Peanut Butter Cake
Whole Cake Recipes
Decadent Dark Chocolate Beer Cake
Whole Cake Recipes
Rainbow Layer Cake