Frida Kahlo Cake
Recipe Ingredients
Buy the Products
How to Prepare:
First up lets make the sponge; preheat the oven to 180°C/160°C fan/Gas Mark 5 and grease and line 3 x 8” round cake tins. Melt your White Chocolate in the microwave in 30 second bursts, stirring between each burst until it has melted.
Cream together the butter and sugar until lovely and smooth, pop in the eggs and Vanilla Extract and mix together until all combined. Sift over the flour and Baking Powder then fold into the mixture. Pour in the melted chocolate and fold through. Finally pour in the raspberries and fold through the mixture.
Divide the mixture equally between your prepared cake tins and smooth the tops. Bake your cakes for 20-25 minutes until lightly golden and a skewer inserted into the centre comes out clean. Leave to cool in the tins for 10 minutes and then pop onto a wire rack to cool completely.
Once your cakes are cooled, it is time to make the raspberry buttercream filling; melt the white chocolate in the microwave in 20 second bursts stirring between each burst until melted. Set aside to cool for 10-15 minutes until its room temperature but still runny.
Pop the butter into a large bowl and beat with an electric whisk or freestanding mixer until light and fluffy. Then sift in the icing sugar then add the vanilla extract and beat again until everything is all mixed together.
Pour in the melted white chocolate and beat together for a few of minutes until light and fluffy in texture. Then mix in the raspberries until they’re all broken up and ta-da, you’ve got yourself a pretty pink buttercream!
Use a serrated knife to cut any domed tops off your sponge layers. Pop a layer of sponge onto your cake board and smooth a layer of buttercream over the top, sandwich on the next sponge layer and repeat until all your sponge layers are stacked up. Spread the remaining buttercream over the top and sides of the cake and use a large palette knife or cake scraper to smooth out the buttercream, this is your crumb coat. Pop your cake in the fridge to chill for 30 minutes.
Whilst your cake is chilling let’s make the buttercream coating, now you’ve whipped up the white chocolate and raspberry buttercream you know the drill! Melt the white chocolate in the microwave in 20 second bursts, stirring in between each burst until melted and leave to cool for 10-15 minutes until it’s room temperature but still runny.
Pop the butter into a large bowl and beat with an electric whisk or freestanding mixer until light and fluffy. Then sift in the icing sugar then add the vanilla extract and beat again until everything is all mixed together. Add the melted chocolate and beat together for a few minutes until light and fluffy in texture. Buttercream number two is ready to go!
Once you’re crumb coated cake has chilled, add a thick layer of buttercream to the sides and top of the cake and use a large palette knife or cake scraper to smooth it out. Pop back in the fridge to chill.
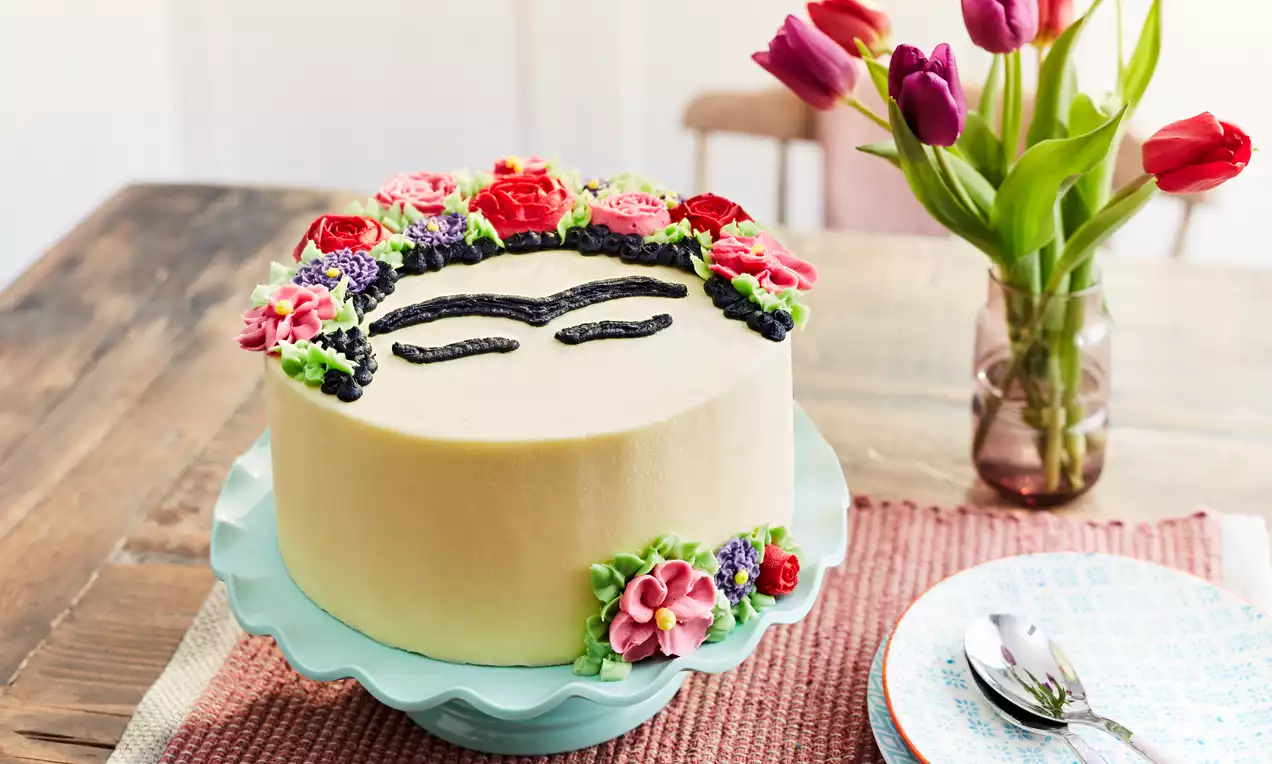
Whilst your cake is chilling it’s time to make the buttercream flowers. We used the petal and leaf nozzle to make the flowers on our Frida Kahlo cake, but you can get creative depending on what nozzles you have. Pop a couple of spoonfuls of buttercream in a bowl and set aside, this is to pipe on the facial features later. Divide the remaining buttercream between 4 bowls and colour one red, one pink, one purple and one green, if your buttercream is quite soft after stirring in your colour gel add a little bit more icing sugar as you want the buttercream to be quite firm to pipe the flowers. Cut up some small squares of greaseproof paper, you will pipe the flowers on these.
To pipe the buttercream roses, take a square of greaseproof and starting in the centre you want the thin point of the nozzle pointing upwards, pipe a circle of buttercream, this should look like a bud and will be the centre of the rose. Continue to pipe in the same way around the centre building up the rose petals. Once you are happy with the size of your rose, pop the square of greaseproof on a tray. Repeat this with the different coloured buttercreams.
The make the flatter flowers, start in the centre again, this time with the nozzle flatter to the greaseproof and the wider part of the nozzle facing outwards. Pipe a petal shape and then continue to pipe petals overlapping them slightly until you have a complete flower. Finish with a blob of a different colour in the centre. Pop onto the tray when you have finished.
Pop your tray of buttercream flower in the freezer for at least 30 minutes to allow them to set, this will make it much easier to transfer onto your cake later.
Once your cake has chilled remove from the fridge. Mix the Black Colour Gel into your reserved buttercream to make a black coloured buttercream. Pop into a piping bag and cut a small hole in the end. Pipe the eyes and eyebrow features on the cake, you can stencil the features onto your buttercream cake first using a cocktail stick and then pipe over it. Pipe dots for the hair around the top and side edges of the cake.
Once your flowers have set, remove from the freezer and using a palette knife gently lift them off the greaseproof paper and pop onto the cake to create a flower headband. Use the green buttercream with the leaf nozzle to pipe leaves in between the flowers to fill in the gaps.
Your spectacular Frida Kahlo cake is ready to wow your friends and family!
RELATED RECIPES
More delicious ideas for you

Siobhan Unicorn Cake
Pink Lemonade Drip Cake
Meringue Kiss Cake with marbled buttercream
Rainbow Carnival Cake
Chocolate Lime Cake
Naked Vanilla Cake